What this workflow does
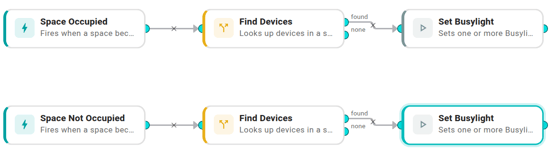
Two parallel arms in one workflow — one per occupancy trigger. Each arm pulls every device tagged room-occupancy-light on The Things Network from the room that just changed, then sets the colour:
Space Occupiedarm → Find Devices → Set Busylight#FF0000(red).Space Not Occupiedarm → Find Devices → Set Busylight#00FF00(green).
The arms share nothing downstream — each has its own Find Devices and its own Set Busylight, hard-coded to one colour. That's because the workflow engine has no shared "trigger that fired" alias across triggers; every template path is rooted at a specific upstream node's id, so a single downstream node can't read from "whichever trigger fired this run". Two arms in one workflow keeps the Executions log and the on/off toggle unified without needing that share.
Occupancy triggers fire only on actual state changes, so the LoRaWAN downlink only goes out when the room flips.
Prerequisites
- The Things Network connected, with at least one Kuando Busylight Omega paired and assigned to the meeting rooms you care about.
- Each busylight tagged
room-occupancy-light(open the device in the org and add the tag). Untagged busylights are ignored — useful if some serve other signals. - An occupancy sensor configured for each room so the
Space OccupiedandSpace Not Occupiedtriggers fire. - Workflows enabled for your organization. See Enable workflows for your org.
Build it
1. Create the workflow
Workflows → New workflow → name Busylight room status → Create.
2. Build the "occupied → red" arm
- Add node → Triggers → Space Occupied. No settings.
- Add node → Conditions → Find Devices. Settings:
- Space ID — switch the mode button to Template and paste
{{ .trigger.space.id }}(in the editor this resolves to the Space Occupied node's id; use the data-reference picker to insert it correctly). - Include descendants — off. Turn it on if the busylight is attached to a child space (e.g. a door) rather than the room itself.
- Integration — pick The Things Network.
- Tag —
room-occupancy-light. - Leave Vendor, Model, Sensor types empty.
- Space ID — switch the mode button to Template and paste
- Connect the Space Occupied trigger to Find Devices.
- Add node → Actions → Set Busylight. Settings:
- Devices — switch to Data reference and pick
findDevices.deviceIds. One action call drives every matching busylight. - On —
true. - Color —
#FF0000. - Brightness —
80. - Pattern —
solid.
- Devices — switch to Data reference and pick
- Connect Find Devices' found port to Set Busylight's input.
3. Build the "available → green" arm
Repeat step 2 with these changes:
- Trigger: Space Not Occupied.
- Find Devices' Space ID template references the Space Not Occupied node (use the data-reference picker on the new arm's trigger).
- Set Busylight's Color:
#00FF00.
This arm sits next to the first one in the canvas, with no edges crossing.
4. Save and enable
Click Save, leave Enabled on. From the next occupancy flip onwards, every tagged busylight in the org responds — no per-room workflow copy needed.
Variations
- Richer signal — combine booking and occupancy. Four colours (held-but-empty, ad-hoc use, etc.) live in Show room status in four colours.
- Throttle a flapping sensor. Chain a Cooldown condition between Find Devices and Set Busylight on each arm so a sensor that bounces every minute doesn't strobe the lights. Useful during sensor warm-up or for spaces with marginal coverage.
- Different palette. Swap the red/green hex codes —
#0066FF/#999999reads well for colour-blind viewers. Each arm has its own Color field. - Lower brightness after hours. Add a Time Of Day condition before each arm's Set Busylight and drop the Brightness on the "outside hours" branch.
When it doesn't behave
- No busylight changed colour. Open the Executions tab. If Find Devices routed
none, no device matched the tag on the TTN integration in that room. If Set Busylight reportsunackedDeviceIds, the downlink left the queue but the busylight hadn't woken — Class C devices ACK on their next keep-alive (15–60s). - Only one arm fires. Confirm both triggers' output is wired into the right Find Devices — easy to mis-connect when both arms look alike.
- Lights took a minute to react. LoRaWAN downlinks aren't instant — a few seconds to tens of seconds is normal depending on your gateway's duty cycle.
- The wrong room's busylight changed. Confirm each busylight is assigned to the right space (not just near it). Find Devices scopes by the trigger's space.
Related
- Show room status in four colours — combine booking and occupancy for a richer signal.
- Find Devices
- The Things Network